Maximus Arcade Setup Documentation
Maximus Arcade is a frontend for managing numerous emulators and executables. It is not an emulator and it won't play games but it will act as a media manager and instruct an emulator to play a game and quit the emulator when you are ready to choose another game or emulator.
The frontend is used for managing and integrating multiple emulators and executables seamlessly under a single interface. The frontend was specifically designed for Windows driven arcade cabinets to allow interaction between numerous emulators for a more seamless arcade experience.
Maximus Arcade Setup Video
EMULATORS, COMMAND LINE PARAMETERS, AND EXTENSIONS SCANNED
The frontend will currently manage the following emulators and executables below. The following emulators listed have been successfully tested although other emulators may be substituted with varying degrees of success.
* Currently configured to only run with the emulator listed.
IMPORTANT NOTE: Newer versions of MAME (150 and above) may require a modification to the 'gamelist.xml' file that is created by Maximus when you first run MAME. If you get an "INDEX OUT OF RANGE" error:
- Open gamelist.xml with Notepad. This file is big, so it will take a minute to open.
- Hit Ctrl+H on your keyboard to open Replace.
- Next to 'find what:' type "machine" without the quotes. Next to the 'Replace with:' type "game" without the quotes.
- Click the 'Replace All' button, wait for it to finish.
- Hit Ctrl+S to save your changes and then you can close Notepad.
| Featured Item | Emulator and/or Wrapper | Command Line | Extensions Scanned |
| 3DO Interactive Multiplayer | FreedoWrapper* | .cue, .bin, .iso | |
| Atari 2600 | MAME | a2600 -cart %file | .bin, .a26, .zip |
| Stella | -fullscreen 1 %file | ||
| Z26 | %file -v1 | ||
| Atari 5200 | MAME | a5200 -cart %file -skip_gameinfo -nowindow -nonewui | .bin, .a52, .zip |
| Atari 7800 | MAME | a7800 -cart %file -skip_gameinfo -nowindow -nonewui | .bin, .a78, .zip |
| Atari 800/800XL | MAME | a800 -cart %file -skip_gameinfo -nowindow -nonewui | .rom, .bin, .zip |
| Atari Jaguar | Virtual Jaguar | .bin, .rom, .jag, .cdi, .zip | |
| Atari LYNX | Handy | .lnx, .zip | |
| Atari ST | MAME | a800 -cart %file -skip_gameinfo -nowindow -nonewui | .atr, .bin, .cas, .com, .d88, .st, .stc, .stx, .xex, .zip |
| Bandai Wonderswan | Oswan 1.7+ | %file -f | .ws, .wsc, .zip |
| OswanHack | -r=%file -f | ||
| BATCH | n/a | .cmd, .bat, .lnk (shortcut file) | |
| Colecovision | MAME | coleco -cart %file -skip_gameinfo -nowindow -nonewui | .rom, .col, .zip |
| Commodore 64 | WinVice | -autostart %file -drive8type 1571 -fullscreen -virtualdev -VICIIdsize | .bz2, .gz, .d6z, .d7z, .d8z, .g6z, .g7z, .g8z, .d64, .d71, .d80, .d81, .d82, .g64, .g41, .x64, .t64, .p00, .tap, .prg, .zip |
| Commodore 128 | WinVice | -autostart %file -drive8type 1571 -virtualdev -VICIIdsize | .bz2, .gz, .d6z, .d7z, .d8z, .g6z, .g7z, .g8z, .d64, .d71, .d80, .d81, .d82, .g64, .g41, .x64, .t64, .p00, .tap, .prg, .zip |
| Commodore Amiga | Winuae | -s use_gui=no -s gfx_fullscreen_amiga=true -0 %file | .uae, .ipf, .adf, .adz, .gz, .dms, .fdi, .zip |
| Capcom Play System 3 (CPS3) | CPS3 Emulator | .zip | |
| Daphne | DaphneLoader v0.99.6 - 1.01* | .bat | |
| DOSBox | DOSBox (dfend_v2_beta_2 to generate conf files) | -conf %file -noconsole | .conf |
| Flash Player | Built-in (Actionscript 2) | .swf | |
| Final Burn Alpha (FBA) | FBA | %name -r 640x480x32 | .zip |
| Future Pinball | Future Pinball | /open %file /play /exit | .fpt |
| GCE Vectrex | MAME | vectrex -cart %file -skip_gameinfo -nowindow -nonewui | .bin, .gam, .vec, .zip |
| Kawaks | Winkawaks | %file -fullscreen | .zip |
| Magnavox Odyssey2 | MAME | odyssey2 -cart %file -skip_gameinfo -nowindow -nonewui | .bin, .zip |
| O2EM | %file -fullscreen | ||
| MAME | MAME / MAME32 | %file -skip_gameinfo -nowindow | .zip |
| Advance MAME | %file -device_video_output fullscreen -quiet | ||
| Mattel Intellivision | Bliss / Nostalgia | %file -fullscreen | .rom, .int, .bin, .zip |
| Bliss 32 | |||
| MSX 1 | MAME | msx -rom %file -skip_gameinfo -nowindow -nonewui | .mx1, .zip |
| MSX 2 | MAME | msx2 -rom %file -skip_gameinfo -nowindow -nonewui | .mx2, .zip |
| Nebula | Nebula | .zip, .cue, .iso | |
| NEC PC Engine | Magic Engine | .pce, .zip | |
| NEC Turbo-Grafx 16 | Magic Engine | .pce, .zip | |
| Nintendo NES | MAME | nes -cart %file | .nes, .unf, .fds, .nsf, .zip |
| Nestopia / JNES / Virtual NES / NNNester | |||
| Nintendo SNES | MAME | snes -cart %file | .sfc, .smc, .swc, .fig, .mgh, .gd, .zip |
| ZSNES | |||
| Nintendo 64 | MAME (requires BIOS file n64.zip) | n64 -cart %file | .rom, .n64, .v64, .z64, .jap, .pal, .usa, .zip |
| Project 64 | |||
| Nintendo Gameboy | VisualBoyAdvance-SDL | -f -4 %file | .gbc, .gb, .zip |
| KIGB / VisualBoyAdvance | |||
| Nintendo Gameboy Color | VisualBoyAdvance-SDL | -f -4 %file | .gbc, .gb, .zip |
| KIGB / VisualBoyAdvance | |||
| Nintendo Gameboy Advance | VisualBoyAdvance-SDL | -f -4 %file | .gb, .sgb, .gbc, .gba, .zip |
| VisualBoyAdvance | |||
| Raine | Raine32 | -g %file -nogui | .zip |
| Sega Dreamcast | nullDC | -config ImageReader:defaultImage=%file | .iso, .bwt, .cdi, .b5t, .b6t, .ccd, .cue, .mds, .nrg, .pdi |
| Chankast-launch wrapper* | Daemon Tools and .NET installation required | ||
| Sega Genesis | MAME | genesis -cart | .cue, .bin, .iso, .smd, .32x, .raw, .gen, .zip |
| KEGA Fusion | %file -gen -auto -fullscreen | ||
| GENS | %file -gen | ||
| Sega 32x | KEGA Fusion | %file -32x -auto -fullscreen | .cue, .bin, .iso, .smd, .32x, .raw, .gen, .zip |
| GENS | %file -32x | ||
| Sega CD | KEGA Fusion | %file -scd -auto -fullscreen | .cue, .bin, .iso, .smd, .32x, .raw, .gen, .zip |
| GENS | %file -scd | ||
| Sega Master System | KEGA Fusion | %file -sms -auto -fullscreen | .sms, .gg, .sg, .sc, .zip |
| Sega GameGear | KEGA Fusion | %file -sms -auto -fullscreen | .sms, .gg, .sg, .sc, .zip |
| Sega Model 2 | Model 2 Emulator | .zip | |
| Sega Saturn | Yabuse | -i %file | .iso, .bwt, .cdi, .b5t, .b6t, .ccd, .cue, .mds, .nrg, .pdi |
| SNK NeoGeo | MAME / MAME32 | %file -skip_gameinfo -nowindow | .ngpc, .npc, .ngp, .zip |
| WinKawaks | %file -fullscreen | ||
| SNK NeoGeo Pocket | Neopop | .ngpc, .npc, .ngp, .zip | |
| SNK NeoGeo Pocket Color | Neopop | .ngpc, .npc, .ngp, .zip | |
| Sony Playstation One | ePSXe | -nogui -loadbin %file | .bin, .iso, .img |
| Sony Playstation 2 | ePSXe | -nogui -loadbin %file | .bin, .iso, .img |
| Texas Instruments TI-99/4a | MAME | ti99_4 -cart %file -skip_gameinfo -nowindow -nonewui | .rom, .bin, .zip |
| U64 - Killer Instinct 1 & 2 | u64emu | .img | |
| Visual Pinball | Visual Pinball | -play -%file | .vpt |
| Windows Media Player | Windows Media Player wmplayer v10+ wmplayer v9 |
%file /fullscreen /fullscreen %file |
.asx, .wax, .m3u, .wpl, .wvx, .wmx, .dvr, .mid, .rmi, .midi, .mpeg, .mpg, .m1v, .mp2, .mp3, .mpa, .wav, .snd, .au, .aif, .aiff, .asf, .wmv, .wma, .avi, .vob, .m2v, .rm, .iso, .divx, .xvid |
| ZINC | ZINC / ZincGui | .zip | |
| Sinclair ZX Spectrum | MAME | spectrum -flop %file -skip_gameinfo -nowindow -nonewui | .zip, .blk, .dsk, .fdi, .mdr, .rzx, .scl, .szx, .tap, .trd, .tzx, .udi, .rom, .bin, .raw, .csw, .voc, .wav |
| Spectaculator |
DESCRIPTION: 3DO and Freedo SetupTo use the 3DO (FreeDO) emulator with the frontend you must first place the "FreeDoWrapper.exe" and support files within the FreeDO directory. Simply have the frontend link to the FreeDoWrapper instead of FreeDO, set your media location in frontend preferences and you should be ready to play. FreeDO requires ISO format disc images. |
DESCRIPTION: Sega Dreamcast and Chankast SetupIt is recommended that you first consider nullDC as your Sega Dreamcast emulator of choice although if you would like to use Chankast below are instructions on its setup. To use the Sega Dreamcast (Chankast) emulator with the frontend you must first install DAEMON Tools and then install Microsoft .NET Framework if not already installed. This suite of tools will allow you to mount Sega Dreamcast disc images. Once installed I would suggest shutting off all options: Secure Mode, Automount, InUse Check, and Autostart. There are some inherent risks involved with turning off "Secure Mode" but it may be worth it to remove the annoying alert box that shows every time you mount a new disc image. You must then place the "chankast-launch.exe" and support files within the Chankast directory. Launch "chankast-launch.exe" and update the preference panel to the location of DAEMON Tools, set the keycode for the virtual drive that DAEMON Tools creates (usually drive: "K" or "J") and set the exit key for the wrapper. Simply have the frontend link to the "chankast-launch.exe" instead of Chankast, set your media location in the frontend and you should be ready to play. DAEMON Tools supports nearly every disc image format available. |
DESCRIPTION: BATCH FILESBatch files are programs that allow MS-DOS and Windows users to create a file to perform long tasks fast. Such as opening certain programs ran frequently, deleting or managing files, etc. Simple batch files do not require any special programming skills. A prime example of a batch file for someone whom may know more about Windows would be relating a batch file to a shortcut in Windows. Batch files like shortcuts are a small file which is used to run frequently accessed programs. Detailed information about creating batch files can be read about here. Creating a batch file is easy and only requires a text editor such as Notepad. Simply create a text file (.txt) and rename the extension to batch format (.bat). Below is an example of a batch file to open the PC game StarWars Battlefront. The most important lines are the last three. Those lines indicate the drive, executable path, and executable to open when the batch file is launched. NOTE: If the executable path or executable file name contains spaces it is necessary to put quotes around the entire string. :: Runs Star Wars Battlefront :: The last three lines of information are also scanned by the frontend in an attempt to monitor which executable(s) was opened. This feature allows the frontend to quit all of the executables when prompted to do so when the user presses the PREVIOUS/QUIT EXECUTABLE key. |
DESCRIPTION: EMULATOR SETUPIt's recommended that you first setup the emulator preferences before opening them through the frontend . From the emulator interface setup the keys/gamepad buttons and set the fullscreen settings, resolutions, etc. The emulator will save its preferences so the next time it is opened (with the frontend), it will use the settings you determined. Most times you will need to setup the emulator with from its own interface before you have the frontend launch it. Some emulators can be sent commands through the command line field in the the frontend preferences (like MESS & MAME), but other emulators need to be setup ahead of time from its own interface. |
DESCRIPTION: INITIAL SETUP
If you have purchased a registration code and you are ready to register, click the "Yes" button. You will then be prompted to enter the registration code into the three fields. Clicking the "No" button will continue opening the frontend. After the registration notice you may be prompted to setup the locations for a number of emulators and executables. Clicking the "Yes" button will open the preferences panel so that you may begin the setup process. Clicking the "No" button will continue opening the frontend but will only allow access to those items that have been configured correctly. |
 Upon initially launching the frontend you will be prompted with the trial version notice. Users are given 30 days of evaluation before a registration code is necessary. There are no restrictions placed upon the trial version. It is the complete version for only 30 days of use.
SETUP PREFERENCES: ABOUT MAXIMUS ARCADE
Ctrl+P - Preferences The preferences panel allows access to all configurable items within the frontend. The registration dialog allows the input of your registration code. Quit exits the the frontend executable. Click on the tabs at the top of the window to view all of the configuration options. |
 The opening preferences panel will gives an overview of the command keys available.
SETUP PREFERENCES: CONFIGURATION: LAUNCH
(2) Click on the button next to the field. You will be prompted by an open dialog box requesting you to locate an executable. Select the appropriate emulator or executable. The path to the executable will then be placed into the field. (3-6) The frontend will do relative folder scanning when selecting an executable. Folders labeled media, images, movies, and marquees are automatically filled into the fields if they exist. The optional image and movie fields allow you to show screenshots (PNG / JPG / GIF / BMP / SWF / FLV) and movies (MPG / AVI / WMV / FLV / MNG) when selecting your games within the interface. For the screenshot or movie to display within the the frontend interface the screenshot or movie must have the same base name as the media: Example: myrom.zip --> myrom.png or myrom.jpg or myrom.swf --> myrom.mpg or myrom.avi or myrom.wmv or myrom.flv (7) Option to enable a "loading screen" when launching an emulator. (8) Delay value in milliseconds for how long the "loading screen" will be displayed. (9) Command line switches allow in-depth control over some executables. Before editing this information make sure that the executable you have configured will support command line switches. When editing or adding a command line switches note that the variable %file represents the path to the file that will be opened. Some command line switches need to place the %file location in different sequences. The variable %file is not always needed but when used it will override the default method that the frontend utilizes. Other variables available are described within the window. The reference to the executable is always supplied and there is no need to provide that in the command line field. The supplied command line entries listed above are specific to the recommended emulators. Don't alter the existing command line switches unless you are certain of the outcome. (10) Window state is the state at which the emulator is launched. Options available are: normal, minimized, maximized, and hidden. This option is automatically set for certain emulators. (11) Path to Media determines whether the media path sent to the emulator is either long or in shortened DOS format. This option is automatically set for certain emulators. (12) The "Use Default" button will reset the launch tab information to the default setup for the emulator selected. |
 (1) Pulldown menu for configuring specific emulator setups.
SETUP PREFERENCES: CONFIGURATION: SCAN
(2) Option to enable file scanning within sub folders. (3) Option to force a rescan of a cached media folder. (4) Option to always rescan media folders upon startup. (5) Option to remove any text with [] or () or from the media description name. (6) The "Use Default" button will reset the scan tab information to the default setup for the emulator selected. |
 (1) File extensions scanned by the frontend use with the selected emulator. Separate all items in the field with a comma.
SETUP PREFERENCES: CONFIGURATION: EXIT
(2) The exit hook field may contain multiple key commands. These key commands are sent to the emulator in an attempt to exit it and return to the game selection interface of the frontend. To enter key commands into this field, click on the field to highlight it. Next enter the key combination you wish to have sent to the emulator upon exiting. You may have multiple key commands in this field. (3) Button to delete entries in the exit hook field (2) when the field is highlighted. (4) Option to close all additional processes that may have started during the launch of the emulator. Use this feature if you notice additional processes open after an emulator should have been closed. (5-6) Option to close specific processes listed within the close field (6). The processes must be listed according to name displayed within the task manager (ex: myprocess.exe) and separated by commas if multiple processes are to be closed. |
 (1) Option to use either internal exiting routines or to use an "exit hook" when exiting an emulator.
SETUP PREFERENCES: CONFIGURATION: PRE-LAUNCH
(2) Click the button next to the path field. An open dialog box will open requesting an application location. Select an application that will launch prior to game launch. The path to the application will be placed into the path field. (3) Command line switches allow additional control over some applications. When editing or adding a command line switches note that the variable %file represents the path to the file that will be opened. Other variables available are described within the window. (4) Window state is the state in which the application will be launched. Options available are: normal, minimized, maximized, and hidden. (5) Path to media determines whether the path for launching the application is either long or in shortened DOS format. |
 (1) Option to run an application prior to launching a game within the interface.
SETUP PREFERENCES: CONFIGURATION: POST-LAUNCH
(2) Click the button next to the path field. An open dialog box will open requesting an application location. Select an application that will be launched after exiting a game launch. The path to the application will be placed into the path field. (3) Command line switches allow additional control over some applications. When editing or adding a command line switches note that the variable %file represents the path to the file that will be opened. Other variables available are described within the window. (4) Window state is the state in which the application will be launched. Options available are: normal, minimized, maximized, and hidden. (5) Path to media determines whether the path for launching the application is either long or in shortened DOS format. |
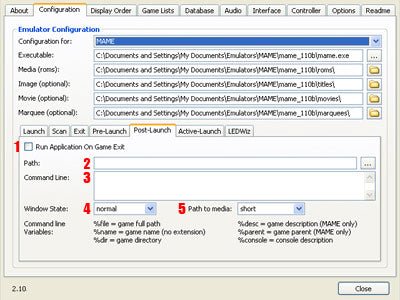 (1) Option to run an application after exiting a launched game within the interface.
SETUP PREFERENCES: CONFIGURATION: ACTIVE-LAUNCH
(2) Click the button next to the path field. An open dialog box will open requesting an application location. Select an application that will launch while within the game selection interface. The path to the application will be placed into the path field. The input to determine this launch function can be assigned within the Controller>Setup1 panel. (3) Command line switches allow additional control over some applications. When editing or adding a command line switches note that the variable %file represents the path to the file that will be opened. Other variables available are described within the window. (4) Window state is the state in which the application will be launched. Options available are: normal, minimized, maximized, and hidden. (5) Path to media determines whether the path for launching the application is either long or in shortened DOS format. |
 (1) Option to run an application while within the game selection interface.
SETUP PREFERENCES: CONFIGURATION: LEDWIZ
(2) Option to use the LEDBlinky configuration settings or launch LWAX animation files within LEDBlinky. (3) Click the button next to the path field. An open dialog box will open requesting the LEDBlinky location. The path to the application will be placed into the path field. (4) Command line switches allow additional control over some applications. When editing or adding a command line switches note that the variable %file represents the path to the file that will be opened. Other variables available are described within the window. Leave the field empty if using the LEDBlinky configuration settings. If using LWAX files, fill in the field with: %parent.lwax (5) Window state is the state in which the application will be launched. Options available are: normal, minimized, maximized, and hidden. (6) Path to media determines whether the path for launching the application is either long or in shortened DOS format. |
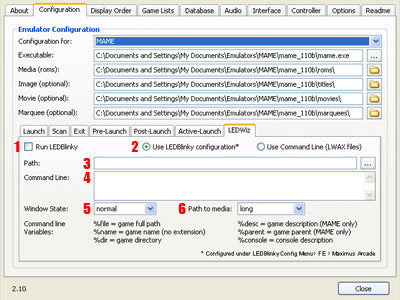 (1) Option to run an LEDBlinky while within the interface.
SETUP PREFERENCES: DISPLAY ORDER
(1) Click on lines within this field to build a list of emulators to display. Once a line has been selected you may use one of the following buttons (3-8). (2) This field contains the current emulator display order. To modify the entries, click on the desired line and press one of the following buttons (3-6, 9-10). (3) When a line is selected (2) and this button is pressed, the line will be moved to the top of the list. (4) When a line is selected (2) and this button is pressed, the line will be moved up one line within the list. (5) When a line is selected (2) and this button is pressed, the line will be moved down one line within the list. (6) When a line is selected (2) and this button is pressed, the line will be moved to the bottom of the list. (7) When a line is selected (1) and this button is pressed, the line will be copied into the display order list (2). (8) When this button is pressed, all entries (1) will be copied into the display order list (2). (9) When a line is selected (2) and this button is pressed, the line will be deleted from the display order list (2). (10) All entries will be deleted from the display order list (2). |
SETUP PREFERENCES: GAME LISTS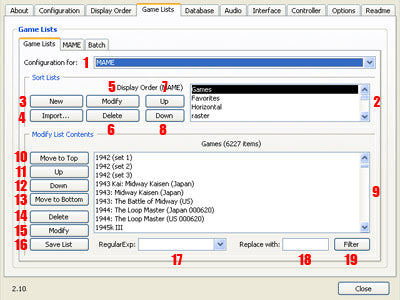
(1) Pulldown menu to choose a specific emulator to configure. (2) List of game lists. (3) New button will create a new game list in the game list field (2). (4) Import button will import a previously created game list into the game list field (2). (5) Modify button will rename the current game list selected in the game list field (2). (6) Delete button will delete the current game list selected in the game list field (2). (7) Up button will move the current game list selected in the game list field up one line. (8) Down button will move the current game list selected in the game list field down one line. (9) The list of games in the current game list selected (2). (10) When a line is selected (9) and this button is pressed, the line will be moved to the top of the list. (11) When a line is selected (9) and this button is pressed, the line will be moved up one line within the list. (12) When a line is selected (9) and this button is pressed, the line will be moved down one line within the list. (13) When a line is selected (9) and this button is pressed, the line will be moved to the bottom of the list. (14) When a line is selected (9) and this button is pressed, the line will be deleted from the display order list (9). (15) Modify button will open a window to edit the description of the current item selected in the games list (9). In case of the MAME emulator, you will also be able to modify the rom associated with the description. (16) Save List button will save any changes made to the games list. (17-19) Regular Expression pattern match. The pattern match will replace the matched contents with the contents of (18) when the filter button is pressed (19). Pre-formatted expressions are available under a pulldown next to the match field. |
SETUP PREFERENCES: GAME LISTS: MAME
(1-8) Use the pulldown menu or selection field to select a parameter. Click the build list button to build a MAME game list based upon the current selection. The game lists are compared against the master list of games for MAME. A popup box will display after the build to determine the game list name. (9) Select a MAME favorites.ini file to import into a game list. |
SETUP PREFERENCES: GAME LISTS: BATCH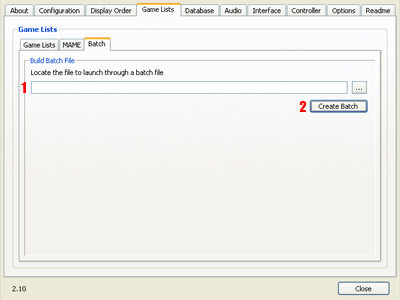
(1-2) The batch file builder will create a batch file for an executable that you designate. Be sure to rescan the batch folder after creation of batch files under Configuration>Launch. |
SETUP PREFERENCES: GAME LISTS: REGULAR EXPRESSIONS FILTERRegular Expressions are useful and very powerful. Below are a few examples of how some simple searches may be used to replace chunks of text in game descriptions as well as removal of entire sections of games from a list. For more information about Regular Expressions and its syntax check out this websitefor a great tutorial.The following example would remove all entries starting with "Mahjong" from the game list: If you wanted to filter out only tags from the description containing a space and the tag "(US)" you would do this: So all game descriptions containing (US) such as "X-Men vs. Streetfighter (US)" would now be "X-Men vs. Streetfighter" If you wanted to filter out only tags from the description containing a space and the tag "[version...blah, blah]" you would do this: So all game descriptions containing [version...]: Would now be minus the search pattern, like "X-Men vs. Streetfighter" for example. ^ = beginning of string Special characters will require the forward slash character in front of it. All alphanumeric characters do not require a slash. Note that you don't need the forward slash character when entering a replacement string into the "Replace with" field. These characters are inserted into the pattern match. |
SETUP PREFERENCES: DATABASE
(1) The frontend uses ClrMAME Pro database files as a cataloging system for some roms descriptions. Currently the list includes: MAME, CPS3, Sega Model 2, WinKawaks, NeoGeo, Nebula, Raine, and ZINC. Be sure to load up the latest ClrMAME Pro database (.dat) into the frontend after each new audit of your roms. All other ROM descriptions for the other emulators and executables use the file name as a description. The Internet button will launch your web browser to the website www.logiqx.com which contains the most up-to-date ClrMAME Pro database files. (2) After downloading the ZIP archive of the ClrMAME Pro database (1), select the database file you wish to update from the pulldown menu and then click the folder button to locate the ZIP archive. The correct file from the ZIP archive will be extracted, renamed, and copied to the the frontend preference folder. (3) Click this button to open a web browser to http://www.progettoemma.net/?catlist or the history database website. These website contains MAME support files that the frontend utilizes. Most files located there are specific to a particular version of MAME so be sure to have the file versions match your version of MAME. (4) The "catver.ini" file is used for generating genre based game lists for MAME. If an updated "catver.ini" file has been downloaded, click the folder button to locate and update the file. The "history.dat" file is used for displaying history data about MAME games. This history panel display can be configured under Controller>Menus panels. |
SETUP PREFERENCES: AUDIO
(1) The master volume control. This controls the volume level of all audio. (2) The ambience volume control. This controls the volume of the ambient audio only. The ambience audio is located in the folder "ambience" next to the frontend executable. MP3 files placed in here will be randomly played. (3) A switch to disable all sound effects within the currently selected interface theme. |

SETUP PREFERENCES: INTERFACE
(1) Pulldown menu to select an available interface theme. (2) Pulldown menu to select computer optimal resolution. NOTE: The higher the resolution the greater the chance for lagging in interface animation. (3) Option to change the monitor to 8, 16, or 32-bit depth. NOTE: Some emulators do not support 8-bit resolution. (4) Pulldown menu to adjust the quality of Adobe Flash files used with the interface. (5) Option to display the frontend at fullscreen or at the specified size. (6) Option to convert all static Flash files (swf files containing only a single frame) to raster images for display within the interface. Use this option if lagging occurs on slower computers. (7) Option to mirror interface graphics. Usage may be necessary for arcade cabinets containing mirrors for display of screen. Usage of option (6) may be necessary if flash files do not display correctly. (8) The author information for the selected interface theme. |
SETUP PREFERENCES: CONTROLLER: INPUT: KEYBOARD
(1) Slide bar to increase or decrease the sensitivity of the keyboard input. The keyboard input will always captured. (2) The initial input delay in milliseconds. This is the initial delay in-between key presses. (3) The maximum number of lines that will be advanced when the scroll accelerator times out. (4) The interval in milliseconds before the acceleration rate increases. (5) Option to flush the keyboard input on exit routines. Use this feature if you experience problems when exiting an emulator. |
For X-Arcade Controller Setup, See Here
SETUP PREFERENCES: CONTROLLER: INPUT: JOYSTICK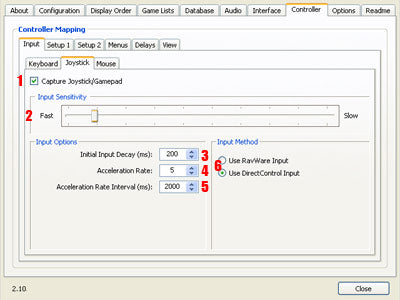
(1) Option to capture joystick and gamepad devices. (2) Slide bar to increase or decrease the sensitivity of the joystick or gamepad device. (3) The initial input delay in milliseconds. This is the initial delay in-between key presses. (4) The maximum number of lines that will be advanced when the scroll accelerator times out. (5) The interval in milliseconds before the acceleration rate increases. (6) Option to use either the RavWare or DirectControl input method. Try switching input options if you are encountering joystick related issues. |
SETUP PREFERENCES: CONTROLLER: INPUT: MOUSE
(1) Option to capture trackball and mouse devices. (2) Slide bar to increase or decrease the sensitivity of the trackball or mouse devices. (3) Option to disable the X-axis when using a trackball within the game selection mode. (4) Option to disable the Y-axis when using a trackball within the game selection mode. (5) Option to exchange the X and Y axis on the trackball/mouse. (6) Option to reverse the X and Y axis on the trackball/mouse. |
SETUP PREFERENCES: CONTROLLER: SETUP 1
The frontend accepts keyboard strokes and most gamepads/joysticks supported through the Windows control panel "Game Controllers". To program the input device select a field with your mouse and press the keyboard / joystick / gamepad button to be associated. Multiple buttons can be entered for each field. Key combinations can also be entered. Multiple joystick / gamepad button support is also available. (1) Pulldown menu of saved controller layouts. (2) Import button allows you to import MAME configuration files (.CFG). (3) Save button will save the current configuration to file which will be named through a popup window. (4) Delete button will delete the currently selected controller layout in the controller layout menu (1). (5-16) Input fields. Highlight the field with your mouse to add an entry. (17) Press the delete button at the bottom of the window to remove settings from a selected field. (18) Option to allow multiple inputs to be assigned with the same key combination. NOTE: This can yield some unpredictable results. Do not use if unless you are sure of your actions. The following gamepads have been tested successfully:
NOTE:A powered USB hub was needed for recognition of the PSX controller. Some USB ports may not meet the power requirements of the PSX controller and USB adapter.
|
|||||||||||||||||||||
SETUP PREFERENCES: CONTROLLER: SETUP 2
(1) Pulldown menu of saved controller layouts. (2) Import button allows you to import MAME configuration files (.CFG). (3) Save button will save the current configuration to file which will be named through a popup window. (4) Delete button will delete the currently selected controller layout in the controller layout menu (1). (5-10) Input fields. Highlight the field with your mouse to add an entry. (11) Press the delete button at the bottom of the window to remove settings from a selected field. (12) Option to allow multiple inputs to be assigned with the same key combination. NOTE: This can yield some unpredictable results. Do not use if unless you are sure of your actions. |
SETUP PREFERENCES: CONTROLLER: MENUS
(1) Pulldown menu of saved controller layouts. (2) Import button allows you to import MAME configuration files (.CFG). (3) Save button will save the current configuration to file which will be named through a popup window. (4) Delete button will delete the currently selected controller layout in the controller layout menu (1). (5-8) Input fields. Highlight the field with your mouse to add an entry. (9) Press the delete button at the bottom of the window to remove settings from a selected field. (10) Option to allow multiple inputs to be assigned with the same key combination. NOTE: This can yield some unpredictable results. Do not use if unless you are sure of your actions. |
SETUP PREFERENCES: CONTROLLER: DELAYS
(1) Configurable delay before the "Quit Executable" button is accepted by the frontend. (2) Configurable delay before the "Quit Maximus Arcade" button is accepted by the frontend. (3) Configurable delay before the "Shutdown Computer" button is accepted by the frontend. |
SETUP PREFERENCES: CONTROLLER: VIEW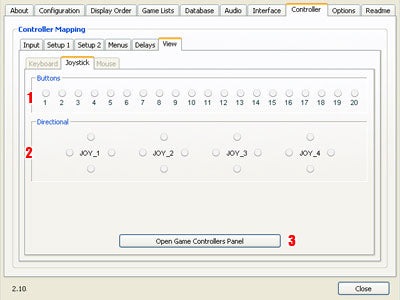
(1) Preview area display of joystick / gamepad button down states. (2) Preview area display of joystick / gamepad directional down states. (3) Opens the Windows Game Controllers control panel. |
SETUP PREFERENCES: OPTIONS: MISCELLANEOUS
(1) Option to verify command line switches sent to an emulator. An alert box will display with the command line before opening the emulator. (2) Option to hide all error messages. This option will be overridden when all executables are not setup properly. (3) Option to disable the windows taskbar. This is on by default. (4) Option to disable windows explorer. (5) Option to disable right-mouse clicking within the interface. (6) Option to close the batch file after the quit executable command is input. (7) Option to extend the search for images and movies. This function uses a fuzzy search method to find potential matches. (8) Option to update screenshots and marquees in real time while scrolling. This function does require a fast computer to work seamlessly. (9) Text-to-speech is available if it is installed. Text-to-speech is a free download from Microsoft. When this option is active the media title will be read aloud. (10) Option to create a shortcut within the windows startup folder. (11) Option to show the import splash screen. (12) Option to skip the logo splash screen. (13) Delay input before displaying movies instead of screenshots within the game selection interface. (14) Option to select an alternative cursor when within the interface. |
SETUP PREFERENCES: OPTIONS: TOOLS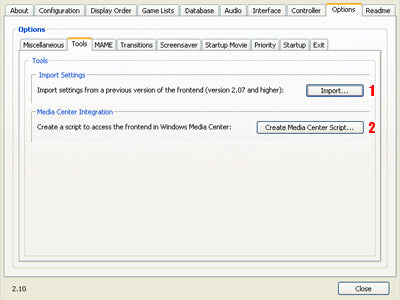
(1) Option to import previous frontend settings. (2) This button will create a link within Windows Media Center to the frontend executable allowing you to launch the frontend through Windows Media Center. If you then set the "Launch Application On Exit" to Windows Media Center you will return to media center after exiting the frontend. |
SETUP PREFERENCES: OPTIONS: MAME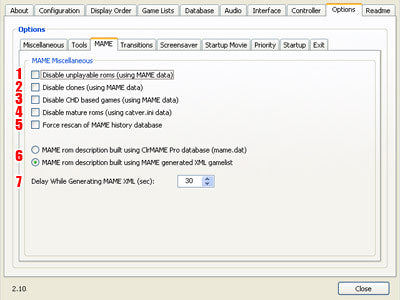
(1) Option to have only working MAME roms displayed in the complete listing. The working rom list is gathered from a MAME generated XML game list. (2) Option to disable all clones. The playable rom list is gathered from a MAME generated XML game list. (3) Option to disable MAME games that use CHD files. (4) Option to disable inappropriate games for children. (5) Option to force rescan of MAME history database (history.dat). (6) Option to choose whether MAME game descriptions are gathered from "mame.dat" file or from MAME XML generated game list. (7) Delay time to wait for MAME XML game list to be generated. |
SETUP PREFERENCES: OPTIONS: TRANSITIONS(1) Option to enable software or OpenGL transitions (2) Pulldown menu of software transitions. (3) Pulldown menu of OpenGL transitions. (4) Pulldown menu of OpenGL performance settings. NOTE: The transitions require an implementation of OpenGL 1.1 or higher to be installed. If transitions do not appear to be functioning incorrectly try updating your video drivers and update to the latest version of Microsoft DirectX. |
SETUP PREFERENCES: OPTIONS: SCREENSAVER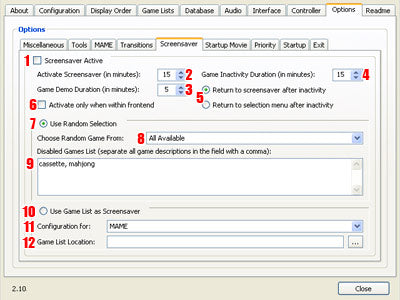
(1) Option to enable the screensaver. (2) Inactive amount of time before the screensaver activates. (3) The amount of time for the game demo to run before switching to another randomly chosen game. (4) The amount of time for a game launched to be considered inactive. The screensaver may either return to the selection menu or return to screensaver mode (5). (6) Option to activate screensaver only when within the frontend (7-8) Pulldown menu to select which emulator will run a random game when the screensaver is active. When "All Available" is selected, a random emulator will be chosen from the list of emulators that are setup. (9) A field to enter names of game titles which will not be enabled through the screensaver. Be sure to separate all game title descriptions with a comma. (10-12) Using a game list as a screensaver requires the user to build a game list, then assign the game list for playback within the screensaver. |
SETUP PREFERENCES: OPTIONS: STARTUP MOVIE
(1) Option to enable the startup movie. (2) Use the folder button to locate an AVI, MPG, WMV, or FLV (Flash video). This movie will be played upon each startup of the frontend. (3) Option to continuously loop the movie. (4) Option to allow a random movie to be selected from the movie location. |
SETUP PREFERENCES: OPTIONS: BACKGROUND TASK PRIORITY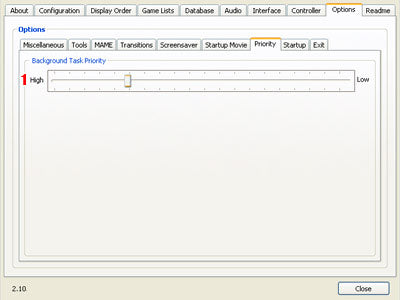
(1) This slider allows you to control the level of priority given to the frontend as it runs as a background task. Slower machines should have this setting to high. |
SETUP PREFERENCES: OPTIONS: STARTUP APPLICATION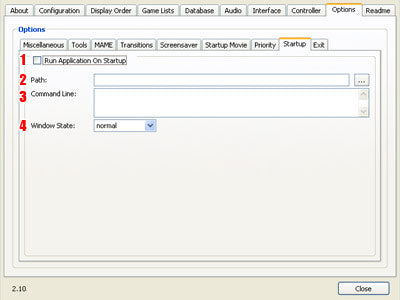
(1) Option to enable the "Run Application On Startup". (2) The path to the application to launch upon startup of the frontend. (3) The command line to send to the application upon startup. (4) The window state to open the application. The options here are: normal, minimized, maximized, and hidden. |
SETUP PREFERENCES: OPTIONS: EXIT APPLICATION
(1) Option to enable the "Run Application On Exit". (2) The path to the application to launch upon exiting the frontend. (3) The command line to send to the application upon exiting the frontend. (4) The window state to open the application. The options here are: normal, minimized, maximized, and hidden. |
SETUP PREFERENCES: README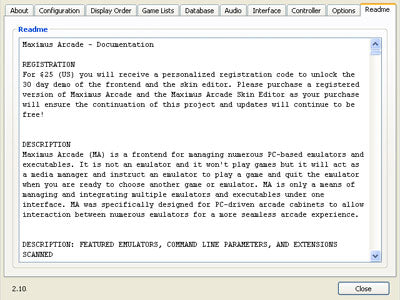
This preference window contains the "readme.txt" file that resides in the Maximus Arcade root directory. Close the preferences window by clicking on the close button at the bottom of the window. |
NAVIGATING THE INTERFACEAfter setup has been completed the scanning process begins. All media is scanned and cached into files residing in the "preferences" directory next to the the frontend executable. This one time process takes about 5 minutes or less depending upon your computer processor speed and the number of files to be scanned. |
 After the scanning process, the selection screen is available. All emulators/programs that have been configured will show as you press the LEFT and RIGHT key. Press the SELECT/SELECT MEDIA key to enter the media selection screen. After the scanning process, the selection screen is available. All emulators/programs that have been configured will show as you press the LEFT and RIGHT key. Press the SELECT/SELECT MEDIA key to enter the media selection screen. |
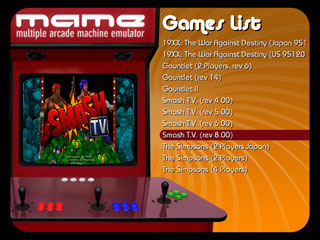 On the media screen, move the selection line UP or DOWN and press the SELECT/SELECT MEDIA button to open that media. If screenshots, movies, or marquees are available they will be displayed within the live areas of the interface. On the media screen, move the selection line UP or DOWN and press the SELECT/SELECT MEDIA button to open that media. If screenshots, movies, or marquees are available they will be displayed within the live areas of the interface.
Pressing LEFT will advance an entire page upward through the media list. Pressing RIGHT will advance an entire page downward through the media list. Pressing the PAGEUP BY LETTER button will advance to the previous alphabetical item based on what item is currently highlighted. Pressing the PAGEDOWN BY LETTER button will advance to the next alphabetical item based on what item is currently highlighted. Pressing the TOGGLE FAVORITES LIST key will switch between the games list and the favorites list. When viewing in the games list, you can press the ADD FAVORITE button to add the currently highlighted media to your favorites list. When viewing the favorites list, pressing the DELETE FAVORITES button will delete the highlighted media from your favorites list. Pressing the VOLUME UP and VOLUME DOWN buttons will adjust the master volume of the computer. Pressing the PREVIOUS/QUIT EXECUTABLE button on this screen will return you to the emulator/executable selection screen. |
 The loading screen shows while the media is opened with the executable. At this point, the frontend becomes a background task that waits for the PREVIOUS/QUIT EXECUTABLE button to be pressed. Once the PREVIOUS/QUIT EXECUTABLE button has been pressed, the frontend will attempt to quit the emulator/executable for you and return to the media selection screen. The loading screen shows while the media is opened with the executable. At this point, the frontend becomes a background task that waits for the PREVIOUS/QUIT EXECUTABLE button to be pressed. Once the PREVIOUS/QUIT EXECUTABLE button has been pressed, the frontend will attempt to quit the emulator/executable for you and return to the media selection screen. Make sure that you are exiting your emulator/executable by pressing the PREVIOUS/QUIT EXECUTABLE button that was mapped in the the frontend preferences panel,not the default emulator quit key. In some instances you may have to press the PREVIOUS/QUIT EXECUTABLE key twice. In the case of some emulators, you may have to hold the key down for up to 10 seconds. |